Tag Archives: dotting

St. Patrick’s Day Inspired Toe Nail Art

18 Mar

2013-03-15_22-34-09_334Toenail art to celebrate St. Patrick’s Day! Aren’t they adorable?! (:

I used Wet N Wild – SaGreena The Teenage Witch, Sally Hansen – Golden-I, and Sally Hansen – Double Duty Strengthening Base and Top Coat. I started by painting all my toenails gold. Then I used my medium sized dotting tool to draw 3 hearts drawing those inwards to create clover petals. I then used a smaller dotting tool to draw just 3 dots close by each other to make a smaller clover on the corner of my big toes. I used a small thin nail art brush to draw the stems on my clovers. Now the hard part: the caviar beads. My advice is that you know ahead of time that this process is very time consuming and takes a lot of patience. This is due to the fact that these beads are completely round tiny balls that are hard to grab and separate, they don’t have flat backs like rhinestones. I did these 39½ weeks pregnant, so my back killed me at the end. So if you’re pregnant, don’t do this! I used clear polish to paint over the entire clover, starting with the large one first and also put clear nail polish on the spinning wheel so I could dip my dotting tool in it to help grab the beads. I had to put the beads in my hand before putting them on because a bunch of them stuck together when I grabbed them. I used 1 sometimes 2 beads and outlined the entire clover with them. After I was finished I used the same process to add caviar beads to my smaller clovers. After I finished those, I used my large light and dark green rhinestones and added them to the bottom centers of my little toes, alternating colors. I finished them off with a clear coat of polish to give it that glossy finish. Now my toes are ready to show off for the Holiday! ❤

2013-03-15_22-34-39_159

Girly Toes: Rhinestones, Bows & Pearls!

16 Mar

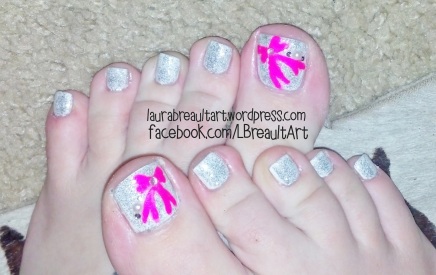
2013-03-06_22-02-49_441Here are my pretty bow toes! They are so girly and I love it! (:

I painted all my toes with two coats of Ruby Kisses French White. Then with one coat of silver sparkle polish by Pure Ice. I then used my large dotting tool to make sideways hearts to form the bow ties with pink polish, and then used my smallest dotting tool to drag out the ribbons. Next time I will use a toothpick so they’re not so rounded! Finally I added a large rhinestone in the center of my bows, a large pearl on one side of the ties, and two smaller rhinestones on each side of the pearl, finishing them off with a clear coat.

Valentine’s Inspired Nail Art Set No.3

21 Feb

2013-02-19_11-27-56_420 2013-02-19_11-28-44_64I know, I know, Valentine’s Day is over, but it’s still February and love is still in the air! So I did one last Valentine’s Day inspired Nail Art design. As I’ve mentioned before I always start with my toes first so that I don’t mess up my nails trying to paint my toes, lol. I call these Princess toenails because they are just so sparkly and glamorous (and Pink!). I used a bright hot pink polish that I bought from Rue 21, plain black, and plain white. It can be any brand because they are all the same in my opinion. I also used my skinny nail art polishes from the Beauty Supply Store, black and silver. However I had to use a nail art brush to draw the white lines because I don’t have a white color nail art polish. After drawing my diagonal stripes I applied one row of rhinestones on each of my toes alternating which colors to cover up and which ones to leave showing. This is how they turned out! Cute, huh? I’m in love with them. And they look FABULOUS with my new flip flops that I just bought. (:

2013-02-19_11-29-05_980

2013-02-19_19-52-10_233

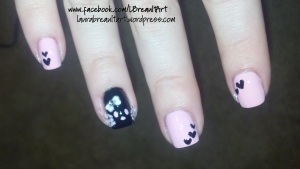
2013-02-19_19-52-40_39 2013-02-19_19-52-20_33As for my nails, I was going to do one of the cutest nail art designs I have ever seen, but unfortunately 2 of my nails broke, so I had to cut them, therefore I had to choose a different design; one that would look good for short nails. The design I originally wanted to do would only look good on long nails. So I will wait for them to grow back before I do it! This design is super cute though. It’s very girly: baby pink, black and hello kitty! This design was simple but it took a lot of concentration because I’m a perfectionist and I wanted the hearts to come out perfectly. First I painted all my nails a pale, baby pink color, except my ring fingers which I painted black. I then used my dotting tool to draw the eyes and nose for hello kitty’s face. I used a short haired nail art brush to draw the whiskers and then applied the infamous pink bow nail decal. For the other nails I did different sized hearts in different places on my nails with a toothpick so I could make them as small or as big as I wanted. I think they turned out amazing! I would have been more specific about the exact polishes and brushes I used as I usually do, but I am wore out and feeling lazy about it, so I will let YOU choose the colors. (;

Teal & White Dots & Bows

22 Dec

Here is my newest work of art! I really think that this is one of the cutest nail designs I EVER saw. I love the mix match gradient colors and the opposite backround colors of all the nails. I just think they are so adorable. I used quite a bit of different nail polish colors: Ruby Kisses French White (Beauty Supply Store), Ruby Kisses Teal Envy (BSS), Love & Beauty Silver Sparkle (Forever 21 – that’s not the real name, the sticker is faded), OPI Happy Anniversary (A sparkly pearly white), Pure Ice Celestial Navy Blue, Sally Hansen Marine Scene Aqua, and Sally Hansen Clear Top & Base Coat. First I painted the base color of three of my nails with the teal envy, and used the french white as the base for my pinky & index finger. I absolutely LOVE how this turned out! I then used my medium sized dotting tool, that finally came in the mail from China, to paint a row of three dots down the center line and two on each side on all my fingers except the ring finger. I painted the blue dots on my white nails and the white dots on my teal nails. I used different color blues and whites to create a gradiant affect for my polka dots. They turned out looking pretty awesome. I then applied rhinestones to my ring finger in the shape of a bow to give them the glamorous look. I got this nail art idea online (Pinterest!) but I didn’t copy everything exactly, I added my own personal touch so I could mean it when I said “I did them myself”. It took me literally two days to do this design because I wanted to make sure the base coat paint was COMPLETELY dry before I started adding all the decorations. It was worth the wait because they are definitely worth stopping and staring! I’ll post a photo of the tools and polishes I used along with result pictures of how they turned out.

PS: I would have made a tutorial video about “how to” but my webcam isn’t working. So once that’s fixed, I’ll be on my way to making my amateur cosmetology videos and posting them regularly! ❤

IMG_20121221_205117

White Flowers

10 Dec

I suppose the first post will be a demonstration of my very first attempt at nail art, my newest hobby.  Tonight I gathered together all the tools that were needed to paint the perfect nail design, the first one I’ve ever done. I think it turned out rather good for a beginner. I watch videos all the time of other girls painting different designs on their nails & toes and it inspired me to do it! I’m telling you, after I was done I felt like I just left the salon-which is the feeling I was hoping for. I looked up some nail art ideas on google and found a design that I thought was easy to do and cute at the same time. I didn’t copy the exact same style, but I did copy the design (I used different colors and a different nail pattern). I ordered some nail art tools on Amazon.com a couple of weeks ago and only 2 out of 6 arrived, one of them being a dotting tool. So that’s what I used for this design. I also used Sally Hansen’s Base & Top Coat Clear Polish, Sally Hansen’s Mighty Mango, Ruby Kisses French White, and Pure Ice Wild Thing Green. Let me know what you think!

Please excuse the side smudges. I was overly excited about taking the picture before I perfected them! (:

Please excuse the side smudges. I was overly excited about
taking the picture before I perfected them! (:

The F. Nails

Nails for the stylish youth

arosebrown

Fashion. Beauty. Photography. Art. Advertising. Design.

Nail Luxxe

Nails, Nail Art Designs, Nail Care & More

Beauty by Brittany

Everything and Anything Beauty!

dottyaboutnails

One girl, ten nails and a million nail polishes....

Polish Alcoholic

I confess... I'm addicted to nailpolish

Doula Momma

Discussing pregnancy, birth, cesarean, VBAC, breastfeeding, babies and more

CosmeticsObsession

Your one stop blog for everything makeup.