Well, since I need to start relaxing for my last 3 weeks of pregnancy, I figured I would get on Pinterest and find some inspiring ideas to occupy my time. I found quite a few amazing project ideas that I’m going to work on for the next couple of weeks while I wait on the rest of Natalia’s nursery decorations to come in the mail before I finish her bedroom!
 #1. Cord Labels – I definitely need to organize my cables because I have so many that I have NO IDEA which is which! So this will be an easy organization project that will save me a lot of time and frustration. I have plenty of bread bag clips that I’ve been collecting since I pinned this, so I have enough to get started! I might decide to make mine extra cute and color them with a hot pink sharpie! ;D

#2. Toiletry Travel Case – Since I went to Gainesville over the weekend and me and my baby’s father are hours apart, this is the perfect travel case for me to make so I can bring it with me! I can foresee myself traveling a lot in the mere future, so this is definitely a must have for me. I already have cute colorful towels, sewing supplies and ribbon, so there’s no additional shopping I need to do to make this project. (:

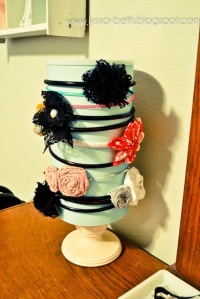
#3. Scarf Organizer – I absolutely LOVE this idea. I’ve seen quite a few of these on Pinterest, but this one is by far the cutest one I’ve seen. I want to make one JUST like but in Pink or Turquoise! I can get the shower rings at the Dollar Tree and the pretty ribbon at Walmart. I already have bright colored paint to paint polka dots and the white hanger. So this will be an easy project to organize my scarves. Then once I hang them I will have an extra drawer of space in my closet to add other stuff, like all the additional craft supplies that I have!

#4. Duct Taped Clipboard – This is a simple 5 minute project that I want to make. I just need a clipboard! (Dollar Tree) I have the duct tape, But I also want to add a pretty pink ribbon at the top just to give it my personal girly touch! Then I can hang it on my wall so it will be an easy grab and go kind of thing and also add decoration to my plain walls. ❤
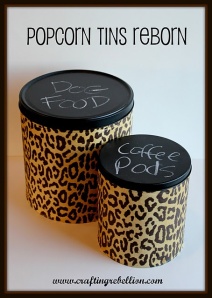
#5. Decorative Storage Tins – Another cute idea I came across that will be easy to make! I like the cheetah print and the black, but I might change it up. I’m not too sure exactly what colors or patterns I want to use, nor what to use them for, but I will figure it out once I start making them. So far, I’m thinking of decorating them with the theme of Natalia’s room and putting them in there for storage and decoration. I could put all my baby-related samples in them, or coupons, maybe even hair bows (although I would rather hang them on the wall). The idea will come to me! I don’t have popcorn tins, but I do have empty coffee tins that I could use.
#6. Oatmeal Can Headband Holder – This idea is very similar to the one prior. I kind of like this one a little better, so I might just blend the two ideas together! I like the fact that you can wrap headbands around this and still be able to open it up to throw in the clips, hair ties and other hair accessories.
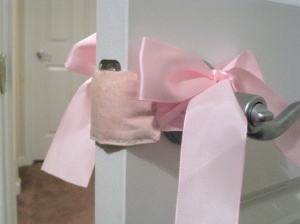
#7. Baby Room Door Muff – Awesome idea! I love how cute and purposeful this is. It’s also very easy to make and I have all the materials needed to make it, so this is definitely on the project list!

#8. Convenient Bib Hanger – This is so perfect and what a great place for them to be! Very convenient baby bib organization. All I need is a large stick-on hanger that I can get very cheap pretty much anywhere. *Added to the grocery list. (;
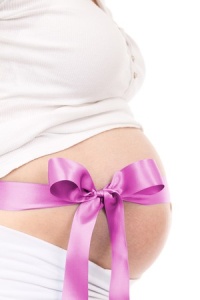
#9. Maternity Photo Idea – I plan to take some professional maternity photos with my baby’s father’s uncle for free and this would be the perfect idea for it. Especially if it is an all black and white photo with the color splash ribbon. This is more of an idea/plan than a project, but it’s definitely on the to-do list!

#10. Healthy Carbonated Beverage – Last but not least an easy delicious beverage recipe to satisfy my sweet tooth and still get the nutrients I need. This delicious blended fruit soda blend will be on my list of drinks to try before I have this baby. (:
So these are my top ten nesting ideas & projects that I want to do while I wait for Natalia’s arrival. I will start my shopping tomorrow afternoon and my next post will look exactly like this one, except they will consist of all MY personal project photos. ♥
Tags: baby, beverage, bib, blend, buy, carbonated, cheap, clipboard, coffee tin, color, color splash, convenient, cord labels, craft, craving, cute, decorate, decorative, delicious, design, Dollar Tree, door muff, easy, grocery list, hair accessories, hairbows, healthy, hobbies, ideas, inspired, materials, maternity, mom to be, mother, nesting, nutrients, oatmeal container, organization, organize, paint, perfect, personal, photo, pink, Pinterest, plans, polka dots, Pregnancy, Pregnant, prego, pretty, professional, project, purpose, quick, recipe, ribbon, room, save time, scarf organizer, sew, shopping, simple, space saver, sweet tooth, toiletry, towel, travel case, turquoise, walmart